Saturday 1 October 2016

Counter Tiles

Counter tiles are marked with this diamond symbol
The Counter flag is very useful to put on impassable tables, benches, fences, walls, etc. The main purpose of it is to allow the Player to trigger an Event that is on the other side of this tile (not immediately adjacent to the Player).

This is how you can talk to shop keepers or inn keepers who sit behind some sort of bench or counter.


It only works when there is one Counter tile between the Player and the Event. So in the above image, the NPC on the right will not talk to you from the front, but will talk to you from the left or right.

Another function of the Counter flag to watch out for is that, on A2 Auto Tiles, the Counter flag changes the way RPG Maker draws those tiles.

Counter flag OFF
Counter flag ON
With the Counter flag ON, the front of the tile extends downwards into the squares below it by 8 pixels.


The Auto Tile is still made up in the same 2x3 pattern, RPG Maker just puts them together a little differently.

Normally, the top 16 pixels and the bottom 16 pixels are put together to create the front of the tile.
But when the A2 auto tile has the Counter flag ON, it's the top 24 pixels and the bottom 16 pixels that get put together, with the bottom 16 pixels being moved down into the below square by 8 pixels.
This is the only difference. It only affects the front or bottom edge, allowing the Player to look like they are standing closer to the counter. Everything else about how the Auto Tile is put together is the same, which makes this useful for A2 counter tops, but not so useful for A2 fences.


Fence Auto Tiles

Trying to create your own auto tiles can be really confusing and frustrating. But there is a formula to it!

I just created my first fence auto tile successfully. It looks like this:


And this is what it looks like in game:

It was actually fairly simple to create since I just followed the formula of the other fence auto tiles. Here's what you need to know:

This 1 tile in the map editor actually has 6 squares behind it. The squares are 32x32 pixels each and must be set out in a 3x2 rectangle.
This top left square is a preview only. It does not get used on your map.
These two squares are made up of exactly the same quarter squares.They have just been placed in a different order.
These quarter squares are used for inner/outer corners.
These outer edges are placed together to make vertical fences.
These outer edges are placed together to make horizontal fences.
Make sure the vertical railings don't cross over into the top horizontal outer edge. Otherwise you get a weird bit of vertical rail in your horizontal fences that doesn't join with anything.
If you keep all these things in mind, creating your own fence auto tile is easy! All you need to worry about is how your horizontal fence looks (front and back), and how the vertical rails join them together. Every other possibility (intersections, corners, a single post, etc) is covered automatically, so you don't even need to think about them!

Saturday 3 September 2016

Shortcuts in the Map Editor

Left Click
Places the currently selected tile

Right Click
Copies every tile on the clicked square and sets that combination as the currently selected tile

Shift + Left Click
Places the currently selected tile
BUT if the currently selected tile is an Auto Tile, then the base tile (without shadows or edges etc) will be placed instead
OR if Shift + Right Click was used prior to this click, places an exact copy of the currently selected tile

Shift + Right Click
Copies the selected tile exactly as it is and sets it as the currently selected tile (very useful when you don't want edges drawn on Auto Tiles)


Secret Passages

Everyone wants to put secret passages in their RPGs, but if your secret passage has to go through an impassable wall, it can get a little complicated.

People have different ways of doing it:
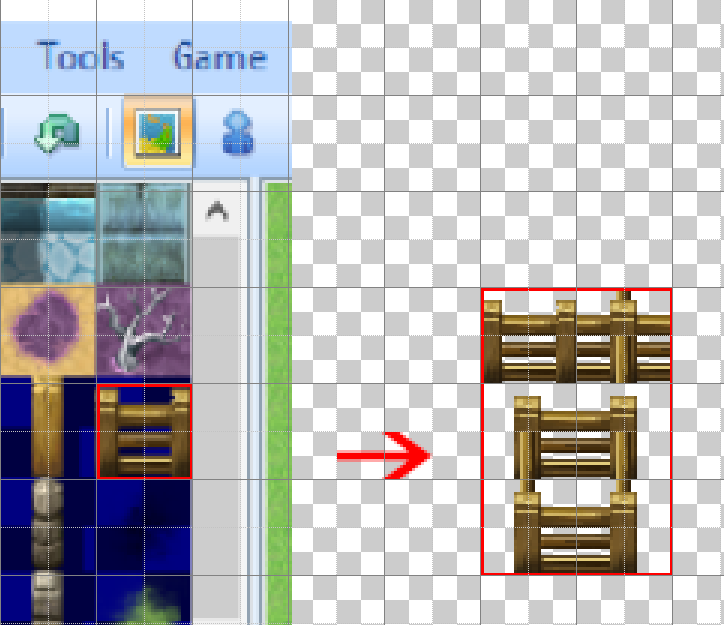
Duplicate Tiles

One of the simplest methods is to just duplicate your impassable wall tile onto another tileset and set it up so that it's passable (with * so the Player is actually hidden beneath it). Then just use those tiles on top of passable ground tiles where you want your secret passage.

The problem with this is that it fills up your available tilesets with redundant tiles, and if your impassable wall tile is an Auto Tile then it is a bit more difficult to duplicate them correctly and you'll likely run into other drawing problems as well. (Do note, however, that holding Shift down when you right click a map tile will copy that tile exactly onto another tile when you left click.)

Forced Movement

Another method I've seen is for the game to take control of the Player's movement while they're in the secret passage, and return control to the Player once they're on the other side.

I personally don't like this method, as it seems to defeat the purpose of having a secret passage in the first place (and I think Player movement should only be controlled during cut scenes).

Yanfly's Move Restrict Region (not a solution)

Yanfly's Move Restrict Region script allows you to specify regions on your map where a Player or NPC cannot go. Of most interest is the option to block passage even if the Player has Through ON.

Region 61 = impassable tiles;
60 = passable tiles.
Using this script, you could use events at the start and end of your secret passage to turn Through ON or OFF on the Player (so they can pass through the impassable tiles freely) and mark an impassable region around your secret passage to prevent the Player from being able to pass through the surrounding walls.

Alternatively, with a few adjustments, you can use similar logic to specify regions on your map where a Player or NPC can always go (even if the tile is impassable!) and this way you no longer need events to toggle Player Through ON or OFF.

This would be the perfect, most efficient, simple, preferred solution, but...

The problem is, the now passable impassable tiles of your secret passage are not drawn on top of the Player. You could create events to turn the Player's transparency on and off, but it's pretty clunky to do so and the animation just isn't smooth.

So if you want to utilise this method, you'd still need additional passable * tiles for your secret passage, which ultimately makes it unnecessary to use this method at all...

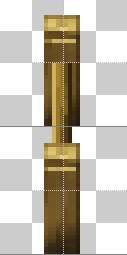
Tile Character Sheets

Similar to the Duplicate Tiles option, you could create special character sheets with your impassable wall tiles and then use Events (with those tiles as their graphic, and Priority set to Above Characters) to mark out your secret passage.

If you don't mind having a load of Events that don't do anything on your map, and you don't mind the tediousness of it (especially if you want your Player to also move over the top of these tiles at some point), then this is a pretty simple method that works pretty well once you've set up the character sheets (if your tiles are Auto Tiles, then this can take a bit of work).

Keep in mind that you need to save your character sheet with a ! at the start of its filename for RPG Maker VX Ace to draw them at their proper size.

Hime's Map Overlay 

Hime's Map Overlay script allows you to have another map drawn over the top of an existing map. Using this script, you could put passable ground tiles down on your map where you want your secret passage to be, then create another map of the same size with your Auto Wall Tiles in the same place, and have Hime's script overlay it on top.

The Player would then freely be able to pass through your secret passage, hidden underneath the overlaid wall tiles, and no tricky event logic would be needed on your part. What's more, you can still use the overlay map as a normal map if you want your character to be able to jump across rooftops or something.

The downside is that you end up with extra maps in your map list, you can't see the overlay in the editor, and as such it can be a little tedious lining the two maps up.

Also, Hime's scripts are not free for commercial use.

Player Touch Trigger


The Player Touch trigger behaves differently depending on what Priority you give to your Event, and also depending on whether the Event has Through ON. It's pretty straight forward when the map tile beneath the Event is a passable one, and Through is OFF:

(Where Through is mentioned, it is always referring to the Through setting for the Event unless specifically stated otherwise.)

Events on Passable Map Tiles

Priority = Below Characters

The Player can move on top of the Event, and the Event triggers when the Player does so. The Event's Through setting has no effect on the Player.

Priority = Same As Characters

With Through OFF, the Event will trigger when the Player touches the Event by pressing the arrow keys, but the Player does not and cannot move on to the Event.

With Through ON, the Player can freely pass through the Event, but never actually touches it. Hence, the Event is never triggered. Kind of like an illusion, or a ghost. (The same thing happens if the Player has Through ON.)

HOWEVER, if the logic within the Event sets Through ON (when it's triggered), then the Player can touch the Event, trigger the Event, and pass through the Event. BUT from then on, until Through is set back to OFF, the Event will no longer be touchable or triggerable.

Priority = Above Characters

The Player can move beneath the Event, and the Event triggers when the Player does so. The Event's Through setting has no effect on the Player.

Events on Impassable Map Tiles

Some unexpected behaviour may occur when the map tile the Event is sitting on is impassable.

Priority = Below Characters OR Above Characters

Since the Player cannot move on to the map tile where the Event sits, the Event will never be triggered (even if Through is ON).

Priority = Same As Characters

The Event will trigger when the Player touches the Event by pressing the arrow keys, but of course the Player still does not and cannot move on to the Event. 

This is true even if the Event has Through ON or the Event logic turns Through ON when triggered. (Makes sense, since the Player runs into an impassable map tile.)

Check out what this means for Doors and Secret Passages.

Doors

For an explanation of how Player Touch works with different Priority settings, be sure to read this post about the Player Touch Trigger.

Doors

Priority and Trigger settings for a Door
Doors work by placing a passable map tile (usually a black entrance tile) over the top of an impassable wall tile (which makes the map tile passable, as well as for aesthetics), and having your Door Event on top of that

The reason Priority is set to Same as Characters and not either of the others is purely for aesthetic and animation reasons:
From left to right:
Priority = Above, Same, Below
Above is incorrect when beneath the door. Below is incorrect when on the door.

Priority = Above Characters

If set to Above Characters, the Player will walk underneath the door, the door will open on top of them, and they will remain underneath the door as they walk through it.

Priority = Below Characters

If set to Below Characters, the Player will walk on top of the door, and then the door will open beneath them (if it's a trap door in the floor that they're falling through then this is a good thing). 

Priority = Same As Characters

When set to Same as Characters, however, the Player will be in front of the door when coming from the bottom, and then will automatically switch to being behind the door once they're on the same tile. This makes it actually look like they are passing through a doorway, and things like door frames will be correctly drawn above the character.

Another key difference with Same as Characters is that the Player will open the Door before moving onto the Door tile, rather than moving onto it and then opening it either on top of them or beneath them.

Event Logic

This is the logic supplied by RPG Maker's Quick Event Creation -> Door feature:

The logic supplied by Quick Event Creation > Door

With Priority set to Same as Characters, the Door Event itself is actually impassable, which is why the Door Event sets Through ON when it is opened (to make the Event passable). 

If you read this post about the Player Touch Trigger, you'll recall that an Event set to Same as Characters will not trigger if it has Through ON.

For doors that transfer the Player to a completely different map, this does not matter because the Event resets when the Player returns. Of course, these doors also don't have any closing logic on them, either.

Closing Doors

So if you want doors or gates for aesthetics (eg. inside, or on a castle's exterior wall) that the Player can open, close, and pass through without being transferred to a different map, then you have to make sure to add closing logic and turn Through OFF when the door is closed.

Closing logic

It gets more complicated when there is an impassable wall tile above the door, which leads us to Secret Passages.


Player Touch Trigger


The Player Touch trigger behaves differently depending on what Priority you give to your Event, and also depending on whether the Event has Through ON. It's pretty straight forward when the map tile beneath the Event is a passable one, and Through is OFF:

(Where Through is mentioned, it is always referring to the Through setting for the Event.)

Events on Passable Map Tiles

Priority = Below Characters

The Player can move on top of the Event, and the Event triggers when the Player does so. The Event's Through setting has no effect on the Player.

Priority = Same As Characters

With Through OFF, the Event will trigger when the Player touches the Event by pressing the arrow keys, but the Player does not and cannot move on to the Event.

With Through ON, the Player can freely pass through the Event, but never actually touches it. Hence, the Event is never triggered. Kind of like an illusion, or a ghost.

HOWEVER, if the logic within the Event sets Through ON (when it's triggered), then the Player can touch the Event, trigger the Event, and pass through the Event. BUT from then on, until Through is set back to OFF, the Event will no longer be touchable or triggerable.

Priority = Above Characters

The Player can move beneath the Event, and the Event triggers when the Player does so. The Event's Through setting has no effect on the Player.

Events on Impassable Map Tiles

Some unexpected behaviour may occur when the map tile the Event is sitting on is impassable.

Priority = Below Characters OR Above Characters

Since the Player cannot move on to the map tile where the Event sits, the Event will never be triggered (even if Through is ON).

Priority = Same As Characters

The Event will trigger when the Player touches the Event by pressing the arrow keys, but of course the Player still does not and cannot move on to the Event. 

This is true even if the Event has Through ON or the Event logic turns Through ON when triggered. (Makes sense, since the Player runs into an impassable map tile.)

Check out what this means for Doors and Secret Passages.

Thursday 4 August 2016

Battle Backgrounds

Battle backgrounds are not set, as one might think, in the Troops tab of the Database.


The Battleback button on this page is merely for the Battle Test.

Rather, to set the background of your battles you must do so on your map properties instead, which is also where you set what enemies you want in your random encounters.


To change the battle background within your map, you can do so via an Event Command:


Tuesday 12 July 2016

Yanfly's Event Window

Yanfly's Event Window is a small window that automatically pops up whenever the Player gains or loses items or gold, and shows exactly what they gained or lost.

I made the following tweaks:

Only display found items


I didn't necessarily want it to show up for items lost, so I added a flag that would turn that functionality off. You could make this the ID of a global switch, much like the HIDE_SWITCH is, but I don't think I'll ever want to toggle it mid-game, so I'm just setting it to false here.


Then you modify the IF statement like below:
First half of the event_window_make_item_text method

Text format


I also added a space between the icon and the item name, and made it always show the amount that had been found even if only 1 has been found.

Second half of the event_window_make_item_text method

Only show newly found items

I personally found it confusing that the Event Window would retain its data every time a new item was found. It made me think I had gotten another of the previous item. So I added code to clear the data every time the Event Window disappeared.

If you get another item before the Event Window has had time to vanish, however, it still shows the previous item. I think this is okay, because it means the window only shows up once when multiple items are received at a time.


The Event Window actually fades away. It doesn't just vanish instantly. That's why there's an if statement to check if the opacity is at 0 before clearing the data, because this method gets called multiple times, gradually reducing the opacity of the window until it's totally gone.

Play a sound every time an item is found

The Event Window is not very obvious, so I wanted a sound to play every time an item was found.

Done during add_text since that only happens each time an item is found

What I would really like is to make it look like the Message Window and perhaps be in a more prominent place, but I haven't figured out how to do those things yet.

Yanfly's Ace Message System

One of Yanfly's scripts is called the Ace Message System. I originally got this script because it allows you to reference an Item's ID in a Show Text command, and have RPG Maker automatically insert both the Item's Icon and it's Name.

The reason this is important is because you might go and change the icon and/or name of an item at a later date, and if you do you definitely don't want to have to update every single event that refers to it manually.

Gotcha #1


If you install this script, you need to be aware of this section:


It's not made clear, but those numbers 21 and 22 are the IDs of your global variables. So if you're currently using variables 21 and 22 for other purposes, you need to change these numbers to be IDs of ones you aren't already using. Otherwise, you will get weird message window sizes that look broken.

Name Window


The Ace Message System also does a whole stack of other things as well. One of the best things is that it allows you to also display a Name Window above your message windows without having to make a custom script call. (I hate having to remember script calls.)

All you have to do is enter in \n<name> right into the Show Text command, much like any of the other commands to change font size or font colour, etc, and you'll get a name window displayed with the text you put between the angle brackets in it.


Gotcha #2

Call me lazy, but I really didn't want to have to go back over every single Show Text command I'd so far written, and repeatedly type in \n<name> at the start of every single one, nor have to do so for every future one. Nor have to do so again if I happened to change someone's name.

So I modified the script to automatically put a Name Window on every Message Window that contained a Face Graphic, and to use the name of the file as the character's name.

This means that NPCs with specific names need their own Face Graphic file (which is not a bad thing, since I have trouble remembering which Face Graphic is whose for the more important NPCs). It also means that even the most insignificant NPC needs some sort of name or descriptor, but this isn't such a big deal. Descriptors can be really useful for the player, and I just use Villager, or Girl, or Noble, etc, which means I can also group a bunch of Face Graphics together into the same file for those insignificant NPCs for ease of use.

I also scripted it so that it will use the name of the file up until any underscore character. This means I can have 16 servant NPCs in two files named Servant_1.png and Servant_2.png and still have the Name Window just displaying "Servant".

All that's required is to modify the start_name_window method at around line 885 to look like this:


Use Event Name

An alternative is to use Yanfly's original logic of \n<name>, but to modify it so you can specify an Event ID in place of just any string. E.g. \n<21> where 21 is Event 21.

The added line 803 below will take that tag and get the name of the Event that matches the given ID for the Name Window. If this tag is present in the Show Text command, this is what will be displayed in the Name Window rather than the name of the Face Graphic.


The rest of the lines in this method are variations that will change the position of the Name Window. I don't see myself ever doing that, so I didn't bother adding equivalent lines with the Event ID tag.

Gotcha #3

Getting an Event's name requires a bit of further tweaking. Even though the documentation clearly states that the Event object has a name property (and everything on Google indicates that it does for other people), the code I have in RPG Maker actually didn't. 

So I had to go and add this into Yanfly's script as well:

Note that I put this well before the Name Window class.

Yanfly Scripts

After spending about 150 hours learning RPG Maker VX Ace and developing my starting town and the introduction to my main story, I finally hit the world map and random encounters.

I hadn't seen the battle system prior to this, but when I did I was incredibly unimpressed.

So I went Googling and discovered Yanfly's Scripts.

These allow the whole battle system to be changed, and not just the battle system. So I've now come to the conclusion that Yanfly's scripts are a MUST HAVE if you're frustrated with the limitations of RPG Maker, and don't want to write custom script calls all the time. And unlike various other authors of scripts out there, Yanfly most definitely knows what he/she is doing.

The best thing is that the scripts are free to use for everyone provided credit is given to Yanfly, and you give thanks in the form of a free copy of your game.

All Yanfly's scripts can be found here: https://yanflychannel.wordpress.com/rmvxa/

Yanfly provides a tonne of scripts for a wide variety of different purposes, and are mostly well documented, though not all of them will be to your liking. Some are plug and play, while others require a bit of set up such that some programming knowledge really helps.

Installing Scripts

To install a script, open up the Script Editor and scroll down to the Materials section. All custom scripts need to go in this section.


Right click the script list, and select Insert. This will give you a new blank script. Enter a name for it down the bottom, then copy the entirety of one of Yanfly's scripts and paste it in the big blank box on the right.

The order you put the scripts in CAN sometimes matter, so be sure to put any core scripts at the top of the list. (I separate the scripts in the list with blanks to make it easier to find them.)

Then just click OK, make sure to Save your project, and hit Playtest to make sure the scripts don't cause any errors.

NOTE
I haven't encountered this with Yanfly's scripts so far, but something to be aware of is that some scripts will cause the game to crash when loading a game save file that was created BEFORE installing the script, but will work fine if you start a New Game. This is to do with what the script requires to be set up when the game starts, and does not mean the script is a bad script.


Monday 11 July 2016

How to make NPCs stay where you put them

Problem: My NPC doesn't stay where I put him!


Every time the Player enters a map, all events return back to where they were originally placed.

This means that any NPCs you manually moved while the Player was on the map are right back where they started.

This is fine for random townsfolk who move about randomly or just repeat the same route, but if you have cut scenes or any interaction that causes an NPC to change locations (and/or change their behaviour) then it can really stuff you up.

Solution 1

If the NPC is supposed to vanish, the easiest way to get them to remain vanished when the Player comes back is to set a Self Switch (or Switch, if controlling them from a different Event) that switches their behaviour to a new Event Page with no graphic. (Self Switches and Switches maintain their state globally.)

(This solution can also be used to change their Autonomous Movement, if you just want their move route to change.)

Solution 2

If you need your NPC to be in a totally new location, however, the only way to do this without scripts is to create an Event with its Trigger set to Parallel Process. Insert Set Event Location commands and set up each NPC with its new coordinates. 

Once all commands are set, use an Erase Event command. This will terminate the Parallel Process after it has run once, and since Erase Event commands don't actually delete the Event, it will reset every time the Player returns to the map, and all those Set Event Location commands will happen again.

This only runs when the set condition is true