As explained by Shaz at:
https://forums.rpgmakerweb.com/index.php?threads/viewport-for-dummies.32585/
In the RTP, all the menus have only a single viewport, though you can still put things in front of or behind other things by changing the individual sprites' z-values.
On the map and in battles, there are three viewports. Viewports also have z-values.
Viewport 1 has a z-value of 0, Viewport 2 has a z-value of 50 and Viewport 3 a z-value of 100. Then things are layered inside these viewports by the sprites' z-values, just as they are in the menus.
If you have something in viewport 1 with a z-value of 500, anything in viewport 3 will still appear in front, even if those sprites have lower z-values.
Viewport 1 on the map contains the map itself, the background parallax, the character/event/vehicle sprites. When you set the screen tone or make the screen shake, only things on this viewport are affected.
Viewport 2 holds the weather and timer sprites and pictures. When you make the screen flash, this viewport is affected (which also has the appearance of affecting Viewport 1 as well, as this one is in front).
Viewport 3 takes care of the screen brightness, when you do a fade in or fade out or transfer.
Showing posts with label Maps. Show all posts
Showing posts with label Maps. Show all posts
Friday, 21 April 2017

Saturday, 1 October 2016
Counter Tiles
 |
| Counter tiles are marked with this diamond symbol |
This is how you can talk to shop keepers or inn keepers who sit behind some sort of bench or counter.

It only works when there is one Counter tile between the Player and the Event. So in the above image, the NPC on the right will not talk to you from the front, but will talk to you from the left or right.
Another function of the Counter flag to watch out for is that, on A2 Auto Tiles, the Counter flag changes the way RPG Maker draws those tiles.
 |
| Counter flag OFF |
 |
| Counter flag ON |

The Auto Tile is still made up in the same 2x3 pattern, RPG Maker just puts them together a little differently.
 |
| Normally, the top 16 pixels and the bottom 16 pixels are put together to create the front of the tile. |
 |
| But when the A2 auto tile has the Counter flag ON, it's the top 24 pixels and the bottom 16 pixels that get put together, with the bottom 16 pixels being moved down into the below square by 8 pixels. |
Fence Auto Tiles
Trying to create your own auto tiles can be really confusing and frustrating. But there is a formula to it!
I just created my first fence auto tile successfully. It looks like this:

And this is what it looks like in game:

It was actually fairly simple to create since I just followed the formula of the other fence auto tiles. Here's what you need to know:
If you keep all these things in mind, creating your own fence auto tile is easy! All you need to worry about is how your horizontal fence looks (front and back), and how the vertical rails join them together. Every other possibility (intersections, corners, a single post, etc) is covered automatically, so you don't even need to think about them!
I just created my first fence auto tile successfully. It looks like this:

And this is what it looks like in game:

It was actually fairly simple to create since I just followed the formula of the other fence auto tiles. Here's what you need to know:
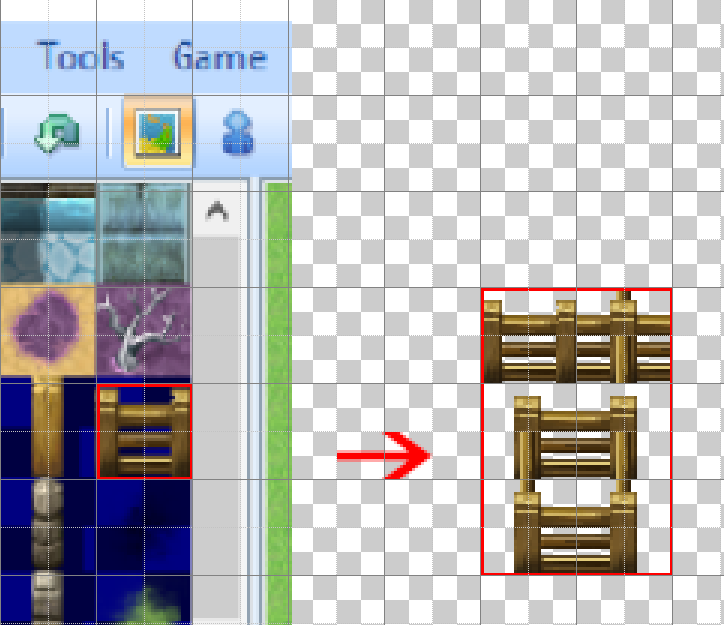 |
| This 1 tile in the map editor actually has 6 squares behind it. The squares are 32x32 pixels each and must be set out in a 3x2 rectangle. |
 |
| This top left square is a preview only. It does not get used on your map. |
 |  |
| These two squares are made up of exactly the same quarter squares. | They have just been placed in a different order. These quarter squares are used for inner/outer corners. |
 | 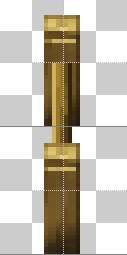 |
| These outer edges are placed together to make vertical fences. | |
 |  |
| These outer edges are placed together to make horizontal fences. | |
 |  |
| Make sure the vertical railings don't cross over into the top horizontal outer edge. Otherwise you get a weird bit of vertical rail in your horizontal fences that doesn't join with anything. | |
Saturday, 3 September 2016
Shortcuts in the Map Editor
Left Click
Places the currently selected tile
Right Click
Copies every tile on the clicked square and sets that combination as the currently selected tile
Shift + Left Click
Places the currently selected tile
BUT if the currently selected tile is an Auto Tile, then the base tile (without shadows or edges etc) will be placed instead
OR if Shift + Right Click was used prior to this click, places an exact copy of the currently selected tile
Shift + Right Click
Copies the selected tile exactly as it is and sets it as the currently selected tile (very useful when you don't want edges drawn on Auto Tiles)
Places the currently selected tile
Right Click
Copies every tile on the clicked square and sets that combination as the currently selected tile
Shift + Left Click
Places the currently selected tile
BUT if the currently selected tile is an Auto Tile, then the base tile (without shadows or edges etc) will be placed instead
OR if Shift + Right Click was used prior to this click, places an exact copy of the currently selected tile
Shift + Right Click
Copies the selected tile exactly as it is and sets it as the currently selected tile (very useful when you don't want edges drawn on Auto Tiles)
Secret Passages
Everyone wants to put secret passages in their RPGs, but if your secret passage has to go through an impassable wall, it can get a little complicated.
People have different ways of doing it:
The problem with this is that it fills up your available tilesets with redundant tiles, and if your impassable wall tile is an Auto Tile then it is a bit more difficult to duplicate them correctly and you'll likely run into other drawing problems as well. (Do note, however, that holding Shift down when you right click a map tile will copy that tile exactly onto another tile when you left click.)
I personally don't like this method, as it seems to defeat the purpose of having a secret passage in the first place (and I think Player movement should only be controlled during cut scenes).
Using this script, you could use events at the start and end of your secret passage to turn Through ON or OFF on the Player (so they can pass through the impassable tiles freely) and mark an impassable region around your secret passage to prevent the Player from being able to pass through the surrounding walls.
Alternatively, with a few adjustments, you can use similar logic to specify regions on your map where a Player or NPC can always go (even if the tile is impassable!) and this way you no longer need events to toggle Player Through ON or OFF.
This would be the perfect, most efficient, simple, preferred solution, but...
The problem is, the now passable impassable tiles of your secret passage are not drawn on top of the Player. You could create events to turn the Player's transparency on and off, but it's pretty clunky to do so and the animation just isn't smooth.
So if you want to utilise this method, you'd still need additional passable * tiles for your secret passage, which ultimately makes it unnecessary to use this method at all...
If you don't mind having a load of Events that don't do anything on your map, and you don't mind the tediousness of it (especially if you want your Player to also move over the top of these tiles at some point), then this is a pretty simple method that works pretty well once you've set up the character sheets (if your tiles are Auto Tiles, then this can take a bit of work).
Keep in mind that you need to save your character sheet with a ! at the start of its filename for RPG Maker VX Ace to draw them at their proper size.
The Player would then freely be able to pass through your secret passage, hidden underneath the overlaid wall tiles, and no tricky event logic would be needed on your part. What's more, you can still use the overlay map as a normal map if you want your character to be able to jump across rooftops or something.
The downside is that you end up with extra maps in your map list, you can't see the overlay in the editor, and as such it can be a little tedious lining the two maps up.
Also, Hime's scripts are not free for commercial use.
People have different ways of doing it:
Duplicate Tiles
One of the simplest methods is to just duplicate your impassable wall tile onto another tileset and set it up so that it's passable (with * so the Player is actually hidden beneath it). Then just use those tiles on top of passable ground tiles where you want your secret passage.The problem with this is that it fills up your available tilesets with redundant tiles, and if your impassable wall tile is an Auto Tile then it is a bit more difficult to duplicate them correctly and you'll likely run into other drawing problems as well. (Do note, however, that holding Shift down when you right click a map tile will copy that tile exactly onto another tile when you left click.)
Forced Movement
Another method I've seen is for the game to take control of the Player's movement while they're in the secret passage, and return control to the Player once they're on the other side.I personally don't like this method, as it seems to defeat the purpose of having a secret passage in the first place (and I think Player movement should only be controlled during cut scenes).
Yanfly's Move Restrict Region (not a solution)
Yanfly's Move Restrict Region script allows you to specify regions on your map where a Player or NPC cannot go. Of most interest is the option to block passage even if the Player has Through ON. |
| Region 61 = impassable tiles; 60 = passable tiles. |
Alternatively, with a few adjustments, you can use similar logic to specify regions on your map where a Player or NPC can always go (even if the tile is impassable!) and this way you no longer need events to toggle Player Through ON or OFF.
This would be the perfect, most efficient, simple, preferred solution, but...
The problem is, the now passable impassable tiles of your secret passage are not drawn on top of the Player. You could create events to turn the Player's transparency on and off, but it's pretty clunky to do so and the animation just isn't smooth.
So if you want to utilise this method, you'd still need additional passable * tiles for your secret passage, which ultimately makes it unnecessary to use this method at all...
Tile Character Sheets
Similar to the Duplicate Tiles option, you could create special character sheets with your impassable wall tiles and then use Events (with those tiles as their graphic, and Priority set to Above Characters) to mark out your secret passage.If you don't mind having a load of Events that don't do anything on your map, and you don't mind the tediousness of it (especially if you want your Player to also move over the top of these tiles at some point), then this is a pretty simple method that works pretty well once you've set up the character sheets (if your tiles are Auto Tiles, then this can take a bit of work).
Keep in mind that you need to save your character sheet with a ! at the start of its filename for RPG Maker VX Ace to draw them at their proper size.
Hime's Map Overlay
Hime's Map Overlay script allows you to have another map drawn over the top of an existing map. Using this script, you could put passable ground tiles down on your map where you want your secret passage to be, then create another map of the same size with your Auto Wall Tiles in the same place, and have Hime's script overlay it on top.The Player would then freely be able to pass through your secret passage, hidden underneath the overlaid wall tiles, and no tricky event logic would be needed on your part. What's more, you can still use the overlay map as a normal map if you want your character to be able to jump across rooftops or something.
The downside is that you end up with extra maps in your map list, you can't see the overlay in the editor, and as such it can be a little tedious lining the two maps up.
Also, Hime's scripts are not free for commercial use.
Thursday, 4 August 2016
Battle Backgrounds
Battle backgrounds are not set, as one might think, in the Troops tab of the Database.

The Battleback button on this page is merely for the Battle Test.
Rather, to set the background of your battles you must do so on your map properties instead, which is also where you set what enemies you want in your random encounters.

To change the battle background within your map, you can do so via an Event Command:


The Battleback button on this page is merely for the Battle Test.
Rather, to set the background of your battles you must do so on your map properties instead, which is also where you set what enemies you want in your random encounters.

To change the battle background within your map, you can do so via an Event Command:

Subscribe to:
Posts (Atom)